Astra Web Portal Tutorials
Astra Portal Overview
Use a browser that supports HTML5, such as Microsoft Edge, Internet Explorer 11, Mozilla Firefox or Google Chrome to log into the Astra web portal.
Go to https://console.astra.cloud.zyxel.com. Click Sign In, then log in with your myZyxel account email address and password.
After you sign in, you will see the Astra Overview screen.
You can rearrange the location of the widget in the Overview screen. Click the widget icon in the upper right corner to drag the widget up or down.
Astra Overview Screen
Astra Navigation Menus
On the left panel are the navigation menus.
Astra Navigation Menus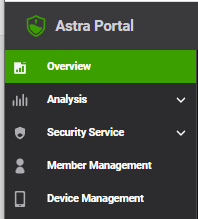
The following table describes these menus.
menu | description |
|---|---|
Overview | Use this menu to see: • Security Statistics - this shows the number of blocked members, number of blocked devices and number of events detected over the last 1 or 7 days. • License Status - this shows your current license and status. • Latest Intelligent Events - this shows event type, which members caused the event and when. • Blocked Events - this shows a graph of the number of events by type: Blocked Threat IP, Blocked Threat Website. Content Filtering (Category), and Blocklist Websites. • Threat Map - this shows a map and a list of countries of where the blocked websites are. • Activity Watch - this shows the total number of scanned sessions, the total amount of processed traffic (in MB), the number of active members and the number of devices online. This menu also has links to related detailed screens. For example, click the arrow next to the number of devices online to go to the Device Management screen. |
Analysis - Security Indicator | Use this menu to view a summary of blocked websites. You can filter the summary display by member name or type of risk, such as blocking of a website by its category or a specific website address. |
Security Service - Content Filtering | Use this menu to view content profiles (categories) and specific blocked or allowed websites you created. |
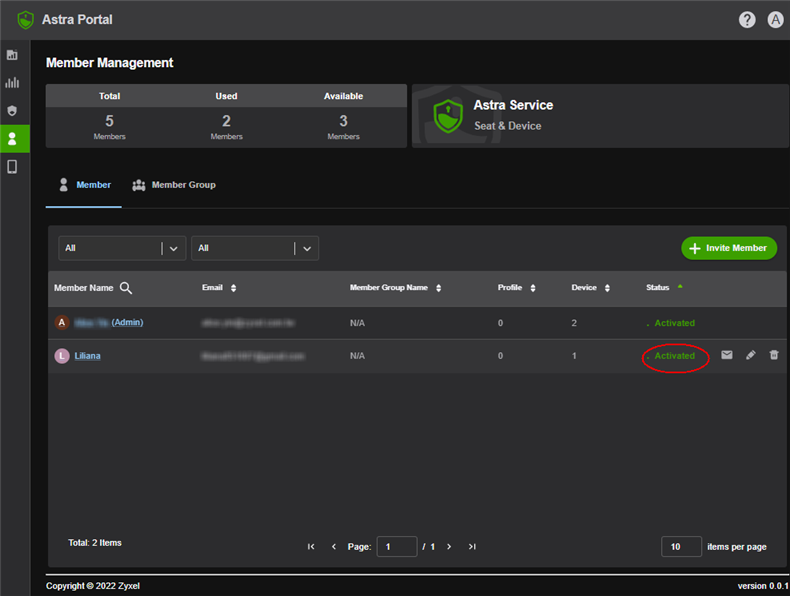
Member Management - | Use this menu to view a summary of members you invited and member groups. You can filter the summary display by group name or activation status. Available means members who you invited but have not accepted the invitation yet. You can also invite new members in this screen. Astra Service means the number of members and devices you can manage with your current Astra license. |
Device Management | Use this menu to view a summary of devices belonging to members that have installed the Astra app. You can filter the summary display by owner name or online/offline status. |
Tutorials
Below are some of the key tasks you can accomplish at the Astra web portal:
• Invite members to join your Astra account, see Invite Members to Use Astra.
• Create member groups, see Create Member Groups.
• Block access to categories of websites, see Block Access to Categories of Websites.
• Block access to specific websites, see Block Access to Specific Websites.
• Allow access to specific websites,, see Allow Access to Specific Websites
• View members activities, see View Members Activities Summary.
• View blocked websites access history, see View Blocked Websites Access History of a Specific Member.
Invite Members to Use Astra
You can invite more members to join your Astra account to protect their mobile devices.
1 Go to Member Management > Invite Member to open the Invite Member screen.
2 Enter a name that will help you identify this member and an email address associated with this member.
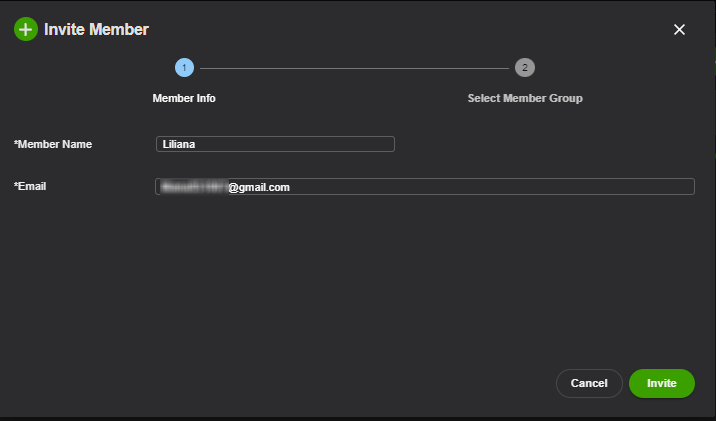
3 Click Invite to have the Astra web portal send an invitation to the email address you entered.
4 You can check the member’s status in the Member Management screen to see if the member has joined your Astra account.
See How a Member Accepts an Invitation to see how a member accepts an invitation.
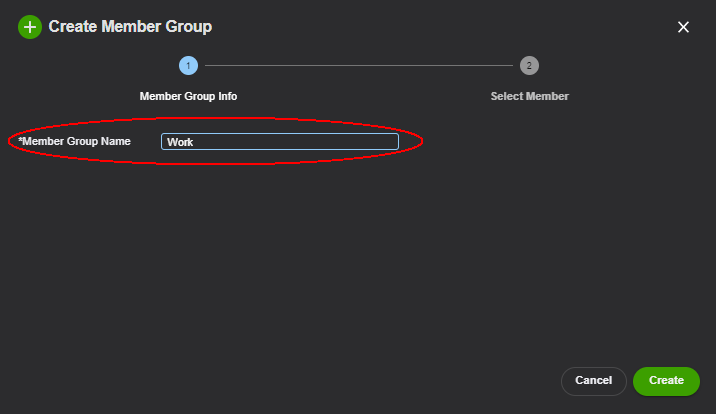
Create Member Groups
You can create member groups to categorize your members so as to apply the same content filter category settings.
1 Go to Member Management > Member Group > Create Member Group to open the Create Member Group screen.
2 Enter a name that will help you identify this member group then click Create.
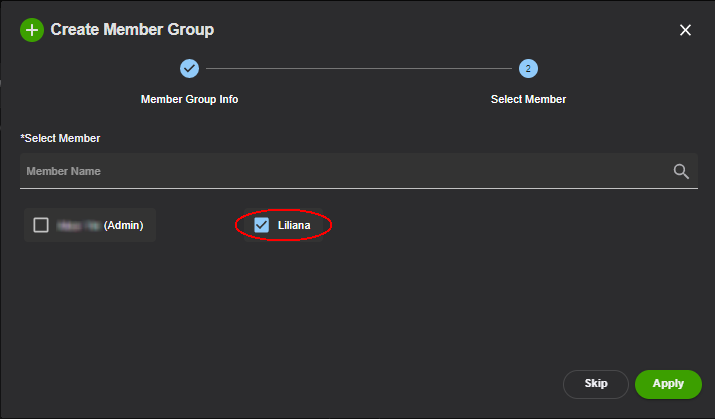
3 Select members that belong to this group. Click Apply to save your changes.
Block Access to Categories of Websites
Content filter profiles block access to web pages that belong to certain categories, such as alcohol or entertainment. Pages belonging to a category are updated periodically and this service is included in the Astra license.
Content Filtering Process
1 A member enters a website address into their web browser on the protected mobile device.
2 Astra content filtering checks if this website belongs to a forbidden category for this member.
3 If the website is forbidden, then access to the website is blocked; otherwise it is allowed.
Content Filtering Example
You want to create a content filter profile to make sure members in the Work member group cannot access websites that are not work related, such as fashion or dating. This examples uses the parameters in the table below.
profile name | description | blocked category | applied member group |
|---|---|---|---|
Non Work Related | For employees at work | Adult Topics Alcohol Chat Dating/Personals Dating/Social Networking Entertainment Fashion/Beauty Gambling Gambling Related Games Online Shopping Sports Travel | Work |
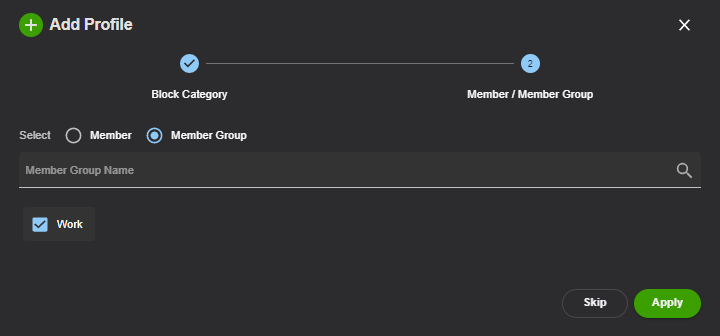
1 Go to Security Service > Content Filtering > Add Profile to open the Add Profile screen.
2 Configure the content filter profile’s Profile Name, Description and Block Category.
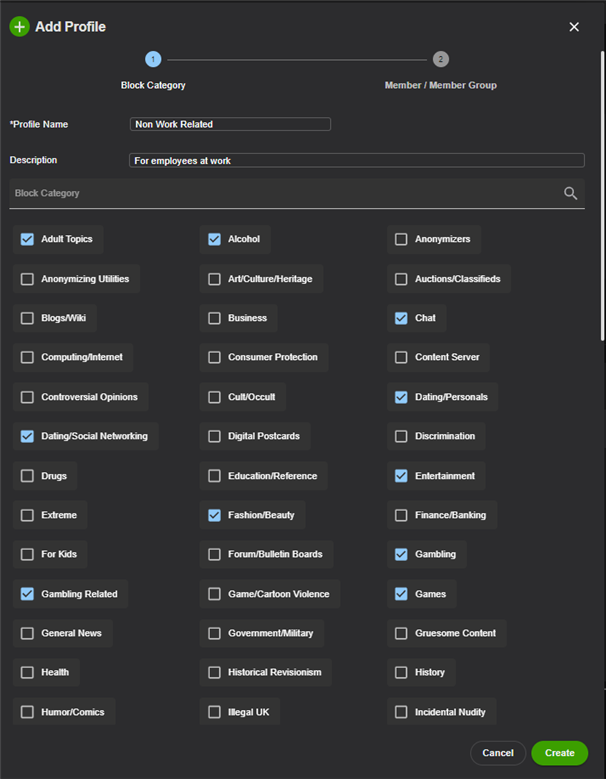
3 Click Create to save your changes.
4 Select the member group Work then click Apply.
Block Access to Specific Websites
Create a list to block specific websites regardless of the content filter profiles. Enter a
• URL (Universal Resource Locator is a complete website address, for example, https://www.zyxel.com)or
• Domian Name (for example, gamespot.com).
Use a comma to separate multiple URLs or domain names.
Example
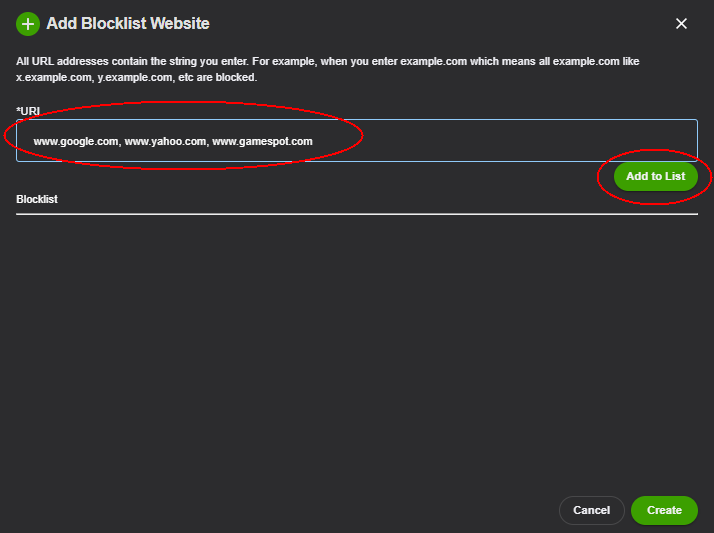
You want to create a block list for the websites listed below to block all your members from accessing these websites.
• www.google.com
• www.yahoo.com
• www.gamespot.com
1 Go to Security Service > Content Filtering > BlockList Website > Add Website to open the Add Blocklist Website screen.
2 Enter the URLs you want to block, separated by a comma, then click Add to List.
3 Click Create to create the block list.
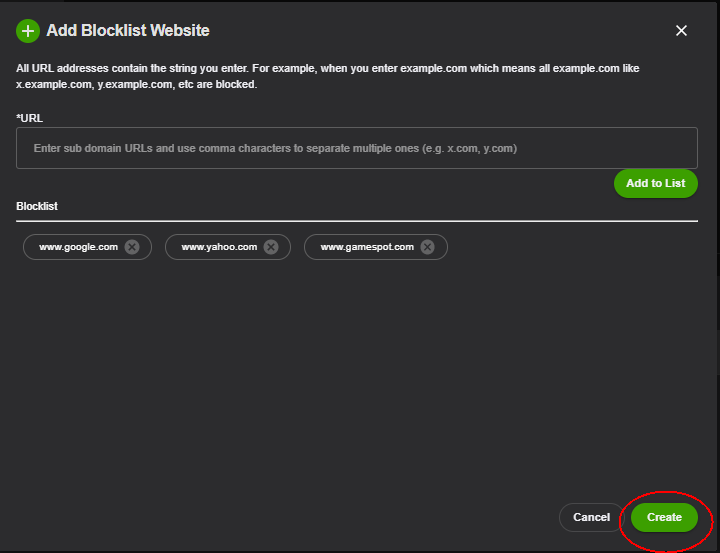
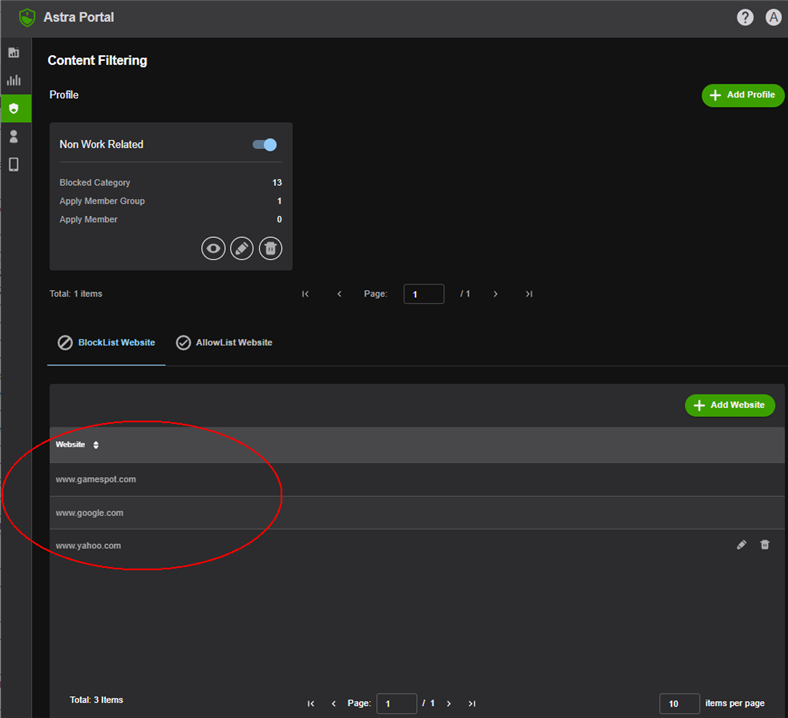
4 You can check the blocked websites in Security Services > Content Filtering > BlockList Website.
Allow Access to Specific Websites
Create a list to allow specific websites regardless of the content filter profiles. Enter a:
• URL (Universal Resource Locator is a complete website address, for example, https://www.zyxel.com)or
• Domian Name (for example, zyxel.com).
Use a comma to separate multiple URLs or domain names.
1 Go to Security Service > Content Filtering > AllowList Website > Add Website (or Add) to open the Add Allowlist Website screen.
2 Enter the websites you want to allow, separated by a comma, then click Add to List.
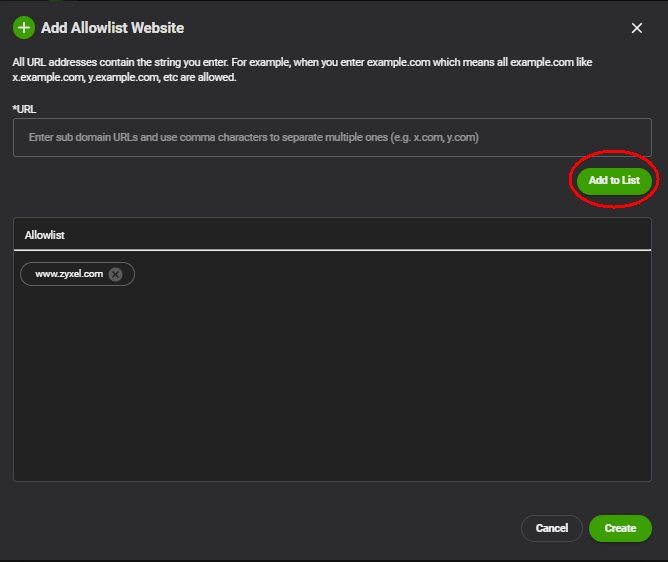
3 Click Create to save your changes.
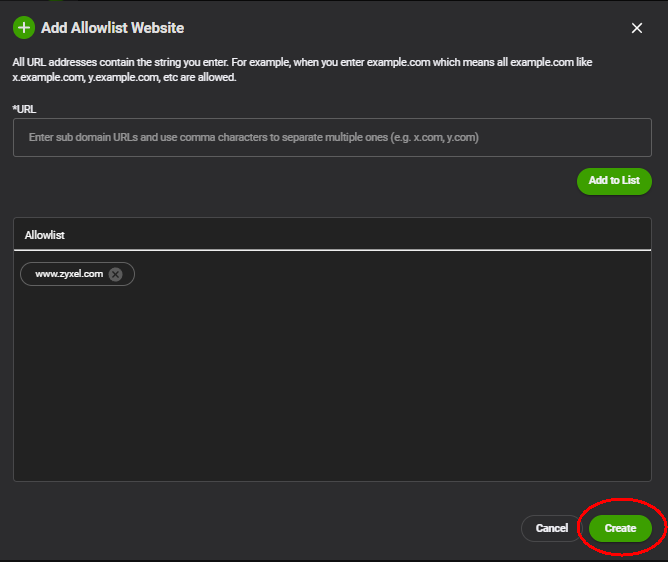
4 You can check the allowed websites in the Security Services > Content Filtering > AllowList Website.

View Members Activities Summary
Use the Overview screen or the Security Indicator screen to see a summary of your members activities.
1 Go to Overview > Latest Intelligent Event. You can see a list of blocked websites that your members tried to access and the reason for blocking it.
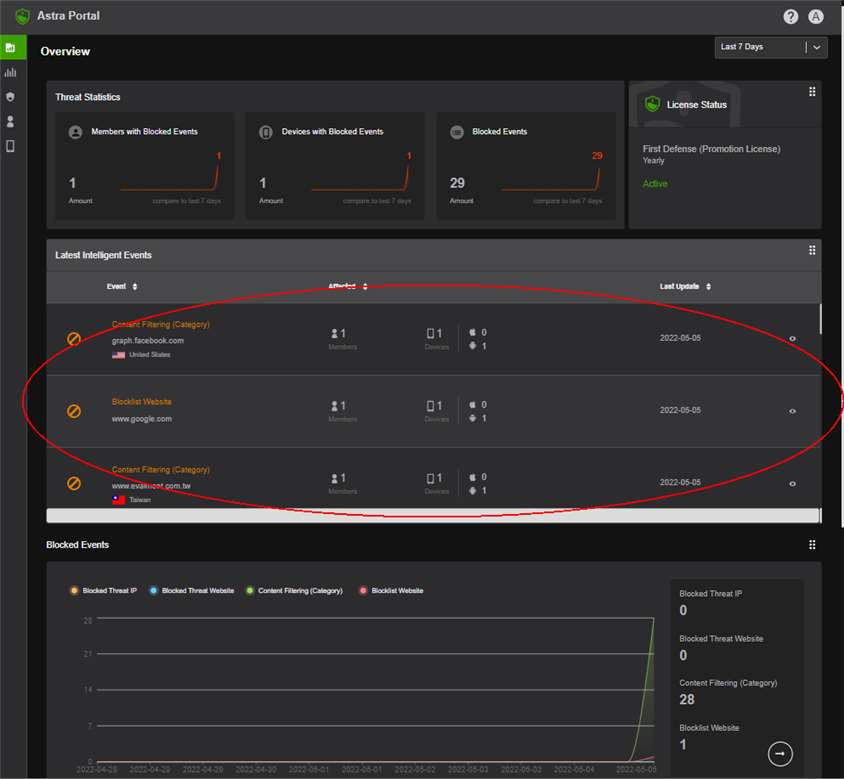
2 Click the eye icon ( ) to see detailed information, such as the name of the member that tried to access the website, the device type the member is using and the reason for blocking the website.
) to see detailed information, such as the name of the member that tried to access the website, the device type the member is using and the reason for blocking the website.
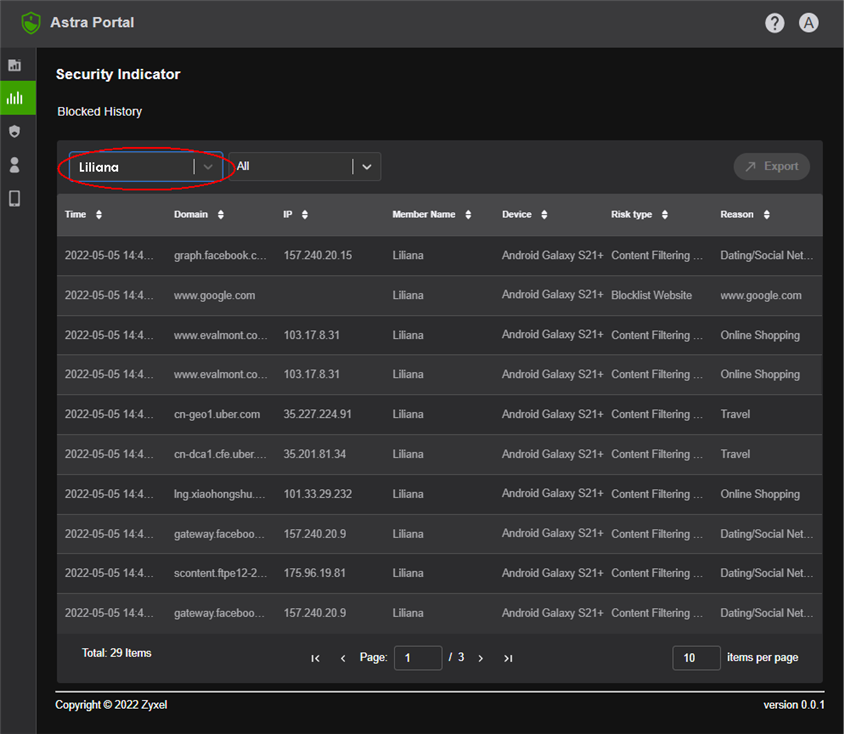
View Blocked Websites Access History of a Specific Member
Go to Analysis > Security Indicator to see the blocked websites access history of a specific member. Select the member you want to view from the drop-down list box.